What’s up, everyone? If you’re all about that sneaker customization life, you already know taping is where it all starts. You can’t just grab any random tape and expect your kicks to come out clean. Nah, you need the right stuff and a solid method to make sure your lines are sharp, and your design hits hard. So today, I’m gonna break it all down for you—the tapes you need, how to use ’em, and a few tips that’ll save you some headaches.
No More Sloppy Soles: Why Taping is a Big Deal
Look, taping is more than just some boring prep work. It’s the key to getting those crisp lines and avoiding paint disasters. You ever see someone with messy paint on the midsole? Yeah, that’s what happens when you don’t tape right. Whether you’re working on some classic Air Force 1s or flexing with a pair of Js, the right taping technique can make or break your custom job.
So let’s get into the real deal on how to tape up your sneakers, and then we’ll explore the essential taping supplies you need to achieve a flawless finish.
The 6 Best Taping Supplies for Sneaker Customization You Need

Not all tape is made the same, and depending on what part of the shoe you’re working on, you’re gonna need different kinds.
- 3M Scotch Contractor Grade Masking Tape 2020: The classic masking tape, readily available. Sticks well but leaves residue on rubber, best for leather.
- Pro Tape Pro 795 Crepe Paper: The sole-saver! Wide, low-tack, perfect for covering entire soles or stencils without messing up the finish.
- Angelus Vinyl Masking Tape Red: Thin and flexible, ideal for detailed work and wrapping midsoles, but can be tricky on curves.
- Scotch Rough Surface Painter’s Tape 2060: The strongman. Sticks to tricky surfaces like where the upper meets the midsole, won’t budge during long projects.
- Gaffer’s Tape: The heat-resistant hero. No residue, perfect for sock liners and other delicate areas that might get warm during customization.
- 3M Wide Scotch Masking Tape: The versatile workhorse. Great for large areas, creating barriers, or pairing with paper towels for full coverage. Peels off clean.
| Tape Type | Recommended | Key Features |
|---|---|---|
| 3M Scotch Contractor Grade Masking Tape 2020 | Leather | Easy to find, leaves residue on rubber, avoid on soles. |
| Pro Tape Pro 795 Crepe Paper | Soles/Stencils | 3-inch wide, low tack, covers soles, no residue. |
| Angelus Vinyl Masking Tape Red | Midsoles (Vans) | Thin, flexible, covers midsole in one pass, great for vulcanized soles. |
| Scotch Rough Surface Painter’s Tape 2060 | Curves (Jordan) | Extra strong, adapts to curves, great for tricky surfaces, no residue. |
| Gaffer’s Tape | Sock Liners | No residue, heat-resistant, perfect for soft spots like sock liners. |
| 3M Wide Scotch Masking Tape | Large Areas | Versatile, easy to pair with paper towels, clean removal. |
Step-by-Step: How To Tape Off Your Sneakers
Now that you’ve got your tape arsenal ready, let’s get down to business and transform those kicks with some expert taping techniques.
1. Taping the Sole
Grab that Pro Tape 795 crepe paper—this stuff is a game-changer. Since it’s three inches wide, one strip covers the whole sole. Lay it down right along the stitch line, and boom, the sole is covered. No residue, no hassle.
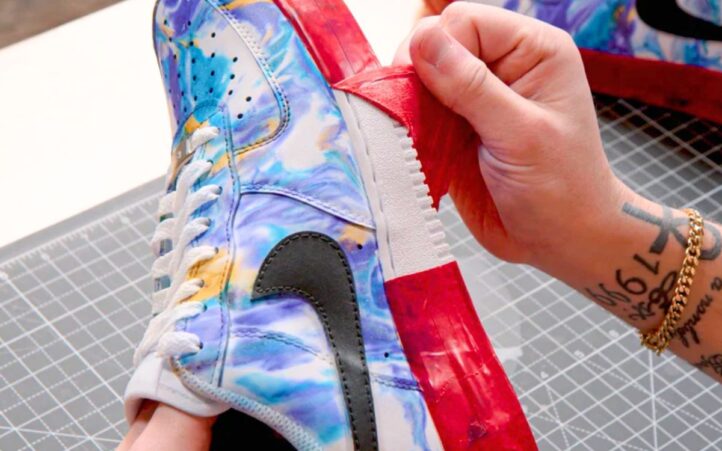
2. Taping the Midsole
Now it’s time to hit the midsole. This is where the green Scotch 2060 comes in handy. Don’t be that person who slices into the leather with an X-acto knife. Instead, tear off some strips of tape and press them in right where the midsole meets the upper. Use your fingernail to seal the edges tight. This way, you’ve got more control, and you won’t risk cutting too deep.
Some people like using one wide piece of tape and cutting it straight across, but I think the strip method gives better precision. Either way, once the tape is down, press it in again to make sure it’s sealed.
3. Masking Off the Swoosh or Small Details
For the small details, the 3M Scotch 2020 masking tape is clutch. Since it’s going on leather, you don’t have to worry about residue. Lay the tape over the Swoosh or any details, and before you start cutting, press it down with your fingernail to get that super-tight seal.
When cutting, here’s the move: cut sideways into the edge of the Swoosh, not from above. This helps you avoid slicing into the leather panel. If you overcut, no worries—just grab a small strip of tape and patch it up.
4. Building a Tape Shield
If you’re about to hit your sneakers with some airbrush action, you’ll need a tape shield. That Pro Tape comes through again. Just one strip can cover a big area, blocking any overspray. It might not look pretty, but trust me, it works.
5. Taping the Sock Liner
Sock liners are tricky, no cap. That’s where the gaffer’s tape shines. Rip off bigger strips and press them into every little curve and corner. Use your fingernail again to make sure everything’s sealed. Sometimes I even build a mini wall with the tape to keep paint from getting inside the shoe. If you’ve got a shoe with lots of holes like a Jordan 6, this step is crucial.
6. Final Check
Before you start painting, double-check your tape job. Run your fingernail over every edge to make sure it’s locked down. You don’t want any paint slipping through, especially when you’re using an airbrush.
Some people like to throw in some extra protection by stuffing the shoe with old T-shirts or plastic bags. That’s cool if you want to be extra careful, especially if the shoe has perforations.
Taping Used Shoes: Clean ‘Em Up & Uncrease ‘Em

If you’re customizing used kicks, prepping them is key. Unlike fresh pairs, used shoes come with dirt, creases, and wear that can mess up your custom job if you don’t handle that first.
Step 1: Deep Clean
- First off, give those kicks a good clean.
- Dirt and grime will mess with how the tape sticks, leading to paint bleeding or the tape peeling off mid-project.
- Use some sneaker cleaner, scrub off all that junk, and let them dry completely before you even think about taping.
Step 2: Tackle Those Creases
- Next, handle those creases.
- Used shoes, especially around the toe box, are bound to have some.
- Stuff ‘em with old T-shirts or plastic bags to smooth things out. This makes taping easier and gives your custom design a cleaner, fresher look.
Step 3: Tape Like New
- Once they’re cleaned and uncreased, tape ‘em up like a fresh pair.
- Make sure to really press the tape down, especially around the worn spots.
- Spend a little extra time on the prep, and your design will come out way smoother in the end.
Perfect Lines, Every Time: Sneakers’ Taping Tips
Alright, let’s get down to the nitty-gritty. We’re about to transform those kicks from basic to bomb with some pro-level taping skills.
| Sneaker Part | Recommended Tape | Tips & Considerations |
|---|---|---|
| Soles | Pro Tape Pro 795 Crepe Paper | Wide enough to cover the entire sole in one go, low-tack adhesive for easy removal without residue. |
| Midsoles | 3M Scotch Contractor Grade Masking Tape 2020 (for smooth midsoles) Angelus Vinyl Masking Tape Red (for curved or vulcanized midsoles) |
Ensure the tape adheres well to the midsole’s texture. Use a sharp blade for precise cuts around curves. |
| Upper/Midsole Seam | Scotch Rough Surface Painter’s Tape 2060 | This tape’s strong adhesive and flexibility make it ideal for conforming to the seam’s contours. |
| Sock Liners | Gaffer’s Tape | Heat-resistant and residue-free, perfect for delicate areas like sock liners that may be exposed to heat during customization. |
| Large Areas | 3M Wide Scotch Masking Tape | Use for covering larger sections of the shoe or creating internal barriers. Can be paired with paper towels for extra protection. |
| Leather | 3M Scotch Contractor Grade Masking Tape 2020 | Offers good adhesion on leather but avoid using it on rubber soles as it can leave residue. |
| Canvas/Fabric | Any suitable masking tape (consider the level of detail required) | Most masking tapes work well on canvas and fabric. Thinner tapes like Angelus Vinyl Masking Tape are ideal for intricate designs. |
| Laces/Eyelets | 3M Scotch Contractor Grade Masking Tape 2020 Angelus Vinyl Masking Tape Red |
Carefully tape around each eyelet and lace hole for a clean paint job. |
| Tongue | 3M Scotch Contractor Grade Masking Tape 2020 3M Wide Scotch Masking Tape |
Cover the entire tongue or use tape to create designs or patterns. |
Additional Tips:
- Overlapping: Overlap tape slightly to ensure no gaps for paint to seep through.
- Burnishing: Press down firmly on the tape edges to create a tight seal and prevent paint bleed.
- Removal: Peel off the tape slowly and carefully after the paint is fully dry to avoid damaging your design.
You’re Ready To Paint & Customize Your Kicks

Now that your sneakers are taped up and ready to go, you can let your creativity loose. Whether you’re airbrushing or hand-painting, a solid taping job keeps everything clean and sharp. It might take some time, but trust me, when you peel that tape off and see those fresh, crisp lines, it’s all worth it.

